Saturday, November 28, 2009

WELCOME TO MY KITCHEN IN SPAIN

From my kitchen window I look over the tops of olive trees, down a long arroyo, across rolling hills to the Mediterranean sea. My house is tucked in a small olive grove in southern Spain, where I’ve lived for more
than 30 years. From my window, I often watch a herd of goats traversing the hillside or hear partridge call at the bottom of the arroyo.  

I’m not Spanish. I grew up in midwest America, land of corn and soybeans, got a degree in journalism and worked as a reporter in the Chicago area before coming to Spain. I arrived to spend a year or two abroad—and never left.

During my first year living in a Spanish village, shopping and cooking were a daily adventure. I learned Spanish cooking in  village tapa bars, where I migrated to the kitchen. Intrigued by all kinds of wigglies, squigglies, uglies and unmentionables (squid, octopus, snails, baby goat, bulls’ testicles and more), I tackled the kitchen with the zeal of the investigative reporter. 

What impressed me about Spanish food when I first came here to live was the freshness of it—the  immediacy of fish just hours from the sea, eggs still warm from the hen, milk from the neighbor’s goat, tomatoes fragrant from the vine, oranges I picked in the back garden. Even the meat--pork chops that a day before I watched go squealing and grunting into the butcher’s back patio.

I loved discovering new produce. I had never seen artichokes growing nor cooked fresh ones. Had never tasted a cherimoya. I couldn’t even identify chard for the longest time. For someone used to reaching for powdered garlic salt, real garlic was a revelation. The variety of glistening fresh fish and shellfish astounded me.      

I collected recipes from Spanish neighbors and, on travels elsewhere in Spain, from restaurant chefs and from just about anybody willing to talk about cooking. With an index file of hundreds of authentic recipes and a passionate desire to stay in my little white-washed village in Spain, I pitched a cooking column to the editor of a locally-published English-language magazine.

Inspired by the fried calamares served in tapa bars, I wrote my first article titled: “The Squid in the Kitchen”. Squid was about as exotic as anything I could imagine in those days. My first line read “Don´t be scared. The squid really won´t squirt ink in your eyes nor the octopus entwine you in a wet embrace.” I  went on to tell readers how to clean and cook squid and octopus. In 30 years of writing the monthly column, I told expats
about unusual produce in the markets; what was seasonal, specialities of the regions, holiday foods, wines to drink with the meals, all accompanied by recipes. I became the expert in Spanish cuisine.

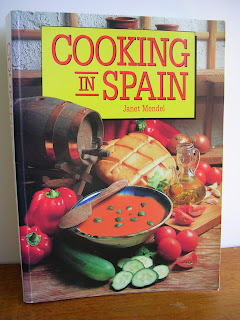
My first cookbook, COOKING IN SPAIN, grew out of those articles. Since then I’ve written several more books about the food of Spain (titles: MY KITCHEN IN SPAIN; COOKING FROM THE HEART OF SPAIN—FOOD OF LA MANCHA; TRADITIONAL SPANISH COOKING, and, the newest book, TAPAS—A BITE OF SPAIN). I continue to write about food and travel in Spain for web, magazines and newspapers worldwide.

I pick my own olives and cure them (here’s how). Although I’m not much of a gardener, I love picking seasonal vegetables from small plots on my terraced hillside.  In summer, I have tomatoes for gazpacho; in fall, chard and cabbage for rustic Spanish potajes (soups and stews); then menestra, a spring medley of artichokes, fava beans and peas.

I have two sons who were born in this olive grove and grew up with this food. Grown men now, they come home with their children, my grandsons, to help me pick olives and join me at the kitchen table.

This is a blog about Spanish food and home cooking, live from my kitchen and garden. I’ll tell you what I’m eating, where I’m eating and how to cook it—with  Spanish style. Let me know what you think—we cooks love feedback!


 To read more about the cookbooks I've written, follow the  link (below) to another post. 


http://mykitcheninspain.blogspot.com.es/2011/05/cooking-books.html 


Follow this link to see a video clip of me and friends in my kitchen in Spain. The video appeared on a Spanish television program.  http://mykitcheninspain.blogspot.com.es/2012/01/ven-la-cocina-come-into-my-kitchen.html

And, here's a gazpacho recipe and a video clip of me with Padma Laksmi in my kitchen in Spain http://mykitcheninspain.blogspot.com.es/2011/08/gazpacho-ole.html  


Come Cook With Me

Join me in my kitchen in Spain.

Want to learn to make paella? Do you dream about perfecting the tricky Spanish potato tortilla? Or, would you like to be able to put together a tapa party? Enjoy a vacation in Spain and come cook with me. I’ll show you how to make authentic Spanish food—in my kitchen in Spain!  

Follow this link to find out more about private cooking classes with me:
http://mykitcheninspain.blogspot.com.es/2012/07/come-cook-with-me.html 

Friday, November 27, 2009

HASTA LA VISTA, BEANS

I  first posted this green bean story early in November, before I had figured out how to format a blog. Readers told me they were seeing code mixed into the text. So, I will try posting it again. By now, the garden beans are finished and I’m delving into my cache in the freezer.

I’ve been eating lots of green beans from my garden. Southern Spain has a year-round growing season, so this is the second planting. The first, harvested in early summer, were wide, flat romano beans. The second crop, just finishing, are skinny haricot beans.


Last week when my son, Ben, and grandson, Leo, were visiting, I got them to help me pick the last of the beans. My six-foot tall son easily reached the ones at the top of the poles that had eluded my stretch. I sent the five-year-old scooting between the rows to pick those hiding at the very bottom. Then, off to the kitchen to cook a heap of beans.

Earlier in bean season, I rarely did anything more complicated than blanch the beans and dress them with extra virgin olive oil. I love green beans fresh from the garden so much that I enjoyed them in solitary splendor rather than as a side dish. Although, heaped beside grilled fresh tuna and sliced tomatoes, an Andalusian take on niçoise salad, they were outstanding.

But these end-of-season beans needed a little more cooking. Some were even mature enough to shell, discarding the leathery pods. I turned to my all-time favorite Spanish vegetable recipe—verduras salteadas con jamón, vegetables sautéed with serrano ham. This is a great way to prepare almost any vegetable, alone or in  combination. Besides green beans, asparagus, fava beans, artichokes, chard, broccoli and  peas are great choices. So, this is a recipe for all seasons.

American friends who visit me in Spain often complain that Spanish meals, at least in restaurants, are short on vegetables. Markets are heaped with fresh produce, but vegetables, other than potatoes, don’t turn up on the dinner plate as a side with an order of meat, poultry or fish. However, menus often list vegetable dishes along with salads, as starters. This one is a traditional favorite.

I serve these sautéed beans as a starter or, with the addition of quartered hard-cooked egg, as a main dish for lunch or a light supper. The diced serrano ham (vegetables, yes, but not vegetarian) serves as seasoning. You could use (unsmoked) pancetta if serrano ham is not available. The beans need to be par-boiled before sautéeing—a short minute for tender, baby beans or as long as five minutes for older ones.

So, it’s hasta la vista, beans. A great finale. But, I’ll be seeing them again soon, as I’ve packed enough in the freezer to last me through the winter. While frozen ones don’t have the lovely texture of fresh beans, they will be just perfect in this sauté recipe.


Green Bean and Ham Sauté    
Habichuelas Salteadas con Jamón


Serves 1 as a main dish; 2 as a starter; 4 as a side.

1 ½ tablespoons olive oil
1 clove garlic, sliced crosswise
¼ cup diced serrano ham (1 oz)
2 cups cut-up, par-boiled green beans
2 tablespoons chopped red pepper
crushed red chile flakes (optional)
salt and pepper
chopped parsley
hard-cooked egg (optional)


Heat the oil in an earthenware cazuela or skillet. Add the garlic and ham and sauté until the garlic begins to turn golden. Stir in the beans, red pepper, chile, if using, and salt and pepper. Sauté on a medium heat 5 minutes.

To serve, sprinkle with chopped parsley and garnish with quartered egg, if desired.

Tuesday, November 24, 2009

THANKSGIVING ABROAD--BEYOND PUMPKIN PIE

Happy Thanksgiving from Spain. I’ll sieze any excuse for a feast! Though I live in Spain, where Thanksgiving Thursday is not a holiday, I enjoy having  friends and family over for a special dinner. For me, Thanksgiving is a harvest celebration, so I usually incorporate foods from my garden. I like the traditional menu—turkey (must be special-ordered from the butcher at this time of year), stuffing, sweet potatoes, pumpkin pie—but often give it a twist, such as a Spanish-inflected stuffing with chorizo.

Last year, the pumpkin pie came up for redefinition.  I had a bumper crop of spagetti squash in my garden and scrambled to find some new ways to cook them. Spaghetti squash (which my Spanish gardener had never seen before) has an identity problem. Vegetable or noodle? The flesh cooks up into skinny strands, or “spaghetti”. Thus, its identity problem. And, also its versatility. I decided it could go either way.


I took my spaghetti squash around the globe. Starting in Spain, I used it in one of my favorite vegetable preparations. I prepared a quick “dressing” of slivered garlic, flecks of chile and serrano ham sautéed in olive oil with the addition of smoked Spanish paprika and tossed it with the cooked strands of spaghetti squash. It made a great vegetable side with roast turkey, pork chop or grilled salmon.

Looking to Italy, I tossed the cooked squash with a garlicky pesto sauce and lots of grated cheese. Texturally speaking, lightly cooked spaghetti squash easily subs for shredded cabbage in slaw. With a hint of ginger, the slaw pairs with simple grilled chicken breast or goes nicely alongside a juicy burger on a bun.

A squash is a squash is a pumpkin. Using that logic, I decided to substitute spaghetti squash for smooth pumpkin puree in a pie. The result is a pie with traditional flavor plus lots of texture. “Very unusual,” said one guest. “I love it!,” said another. “Better than yucky pumpkin,” said one of the kids.

How to prepare spaghetti squash
    Use a sharp knife to cut the squash in half lengthwise. Scoop out the seeds and discard them. Place one half, cut side down, in a microwave-safe container with 1/4 cup water. Microwave on high (full power) for 5 minutes. Turn the squash cut side up. Microwave on high for 5 minutes. Allow the squash to stand 5 minutes. (For a crunchier texture, microwave 4 minutes on each side.)


Repeat the procedure with the remaining half. Use a fork to scoop out the strands of squash. Squash may also be steamed until tender.


A squash weighing 1 3/4 pounds yields about 2 cups cooked and shredded flesh, serving 4 as a side dish.


Spaghetti Squash Pie
  
Honey replaces sugar and yogurt stands in for evaporated milk in this pie. The yogurt is drained to thicken it. Non-fat yogurt will work in this recipe. To pour honey easily, lightly oil the measuring cup.
   
For the crust
1 ¼ cups all-purpose flour
½  teaspoon salt
2 tablespoons sugar
6 tablespoons unsalted butter, softened
1 large egg

Combine the flour, salt and sugar in a food processor. Add the butter and pulse until mixture is crumbly. Add the egg and process just until mixture forms a soft dough.  

Using floured fingers, press the dough onto the bottom and sides of a 9-inch pie pan. Chill the dough 30 to 60 minutes.

Preheat oven to 350º. Line the crust with foil and fill with pie weights. Bake 20 minutes. Remove foil and weights and allow the crust to cool.

For the filling
1 cup plain, unsweetened yogurt
2 cups cooked and shredded spaghetti squash
1-inch piece of fresh ginger, grated
1 teaspoon grated orange zest
3 large eggs
1/2 cup honey
1 tablespoon flour
1 teaspoon cinnamon
1/4 teaspoon ground cloves
1/2 teaspoon salt
1/2 cup coarsely chopped walnuts

Place the yogurt in a fine sieve and allow to drain for 30 to 60 minutes.   

Preheat oven to 400º.

Place the squash in a mixing bowl. Add the ginger and orange zest and toss. Combine drained yogurt, eggs, honey, flour, cinnamon, cloves and salt in a blender and blend until smooth. Pour the mixture into the squash and combine well. Fold in the walnuts.
 
Ladle the squash mixture into the partially-baked pie crust. Bake 20 minutes. Lower oven heat to 350º. Bake until a skewer comes out clean, about 30 minutes longer.
 
Cool the pie on a rack. Serves 8.


Saturday, November 21, 2009

PICK A PECK OF PIQUILLO PEPPERS

When I spotted the packet of piquillo pepper garden seeds, I thought it seemed a brilliant idea—plant a whole field of peppers and enjoy them fresh instead of buying them in cans.

Piquillo peppers are those flame-red peppers you buy in jars in the gourmet section of the grocery store. Chefs and food magazines rave about them for their complex sweet and piquant flavor. Once an artisanal product from Navarra, where they are grown in the area around Lodosa in the Ebro valley (and where they enjoy PDO—protected denomination of origin—status), in the last 20 years their fame has spread far and wide. Piquillo peppers are roasted over coals, peeled and packed in cans or jars. Beyond trendy, they have become an emblematic and essential ingredient. 

That’s why I thought growing them would be a dream-come-true. I would roast them myself and conserve them in olive oil. I was already planning to serve a starter of tiny piquillos stuffed with shrimp for Christmas dinner. Their gorgeous red color makes them perfect for festive meals.

Well, I have to confess, my piquillo dreams were dashed. Oh, I picked my peck of piquillo peppers, all right. They were beautiful specimens, crimson in color, small (3 to 4 inches) triangular peppers with tips like little curved beaks (piquillo means beak). I picked peppers from September till November.

The first thing I learned is that the skins of fresh piquillos are like leather. Whether green or red, raw or cooked, the skins are too tough to chew. Which explains why the only way you ever find these peppers is roasted and skinned, in conserve. 

So I started roasting them. I tried charcoal, gas flame and broiler. I baked them, I steamed them. But after hundreds of peppers passed through my home processing, I had not a single whole one suitable for stuffing. The flesh was so delicate it ripped into shreds or had to be scraped from the tough skin. Perhaps this was due to lack of some nutrient or insufficient water in my terroir. Instead of meaty little whole peppers, I had a quantity of piquillo pulp. This I packed in small containers and put in the freezer, an ingredient for a sensational sauce.

The next thing I discovered when I went to the supermarket to buy canned piquillos for the beauty shot is that they are imported from Peru! I did find the “real” ones, with the seal of PDO Piquillos de Lodosa, at El Corte Ingles, the department store that is Spain’s equivalent to Nieman Marcus.


About that sauce. If you have a can or jar of piquillos in the cupboard, you have the makings of a fabulous sauce. Serve it with grilled foods, as a dip or as a dressing for vegetables or shrimp. All you have to do is open the can, put the piquillos in a blender with some extra virgin olive oil, salt and a touch of vinegar (Sherry vinegar preferred). Garlic is fine too, or a pinch of thyme or cumin or chopped chile. If you want a sauce to serve with hot foods, just heat the sauce gently in a small saucepan.

You can also confit the peppers—whole or in strips—in olive oil until they are soft and silky and serve them as a side dish. But, best of all is stuffed—with seafood, goat cheese, boned quail. The classic filling is bacalao, salt cod, a version that I’ve sampled in the taverns of San Sebastian (Basque Country). My favorite recipe is piquillos filled with shrimp and topped with cheese.


Pimientos de Piquillo Rellenos con Gambas
Piquillo Peppers Stuffed with Shrimp


The traditional way to prepare the peppers calls for an extra step—before baking with sauce, the peppers are coated in egg and quickly fried, giving them a sort of outer skin that holds peppers and stuffing together. But then you don’t see the luscious red color until you cut into them.

Makes 6 tapas or 4 starters.

4 tablespoons olive oil, divided
2 tablespoons finely chopped onion
2 cloves garlic, chopped
2 tablespoons flour
1 tablespoon dry Sherry
1 cup less 1 tablespoon milk
½ teaspoon salt
6 ounces uncooked, small, peeled shrimp
20 piquillo peppers, drained (2 jars)
4 tablespoons white wine
Flour for dredging peppers
1 egg, beaten
Olive oil to fry the peppers
2 ounces grated cheese

Heat 2 tablespoons of the oil in a saucepan on medium heat. Sauté the onion and 1 clove of the garlic, 2 minutes. Stir in the flour and cook 1 minute. Whisk in the Sherry, milk and salt. Cook, stirring constantly, until sauce is thickened, 5 minutes. Stir in the shrimp and cook 2 minutes. Remove the pan from the heat.

Select 12 of the drained peppers. Carefully spread them open and spoon shrimp filling into them. Place them in a single layer on a shallow pan or tray. When all are filled, cover with plastic wrap and refrigerate for at least 1 hour to allow the filling to thicken.

While the shrimp mixture is chilling, prepare the sauce. Combine remaining 2 tablespoons oil, 1 clove of garlic, white wine and remaining piquillo peppers in a blender and blend until smooth.

Preheat oven to 350ºF.

Place flour and beaten egg in two shallow bowls. Heat oil in a skillet on medium heat. Dip the open end of the stuffed peppers into flour, then dredge the peppers in flour. Roll in beaten egg and fry until lightly golden. Remove the peppers from the pan and place them in a baking dish or individual cazuelitas. Spoon the sauce over the peppers and top with grated cheese.

Bake the peppers until cheese is melted and sauce is bubbly, 15 minutes. Serve hot or room temperature.